Task and Plan
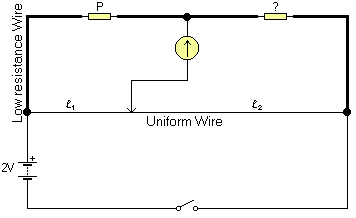
My task is to find the resistances of some unknown resistors, accurately. The Wheatstone brige allows me to do this, and with much more accuracy than using an ammeter and a precise voltage value from the power pack. This is because it is a null method, so it does not depend on the accuracy of the equipment (other known resistors are required, however). Ammeters are not as good for this use since they have internal resistances which bring relatively high errors. Also, the power packs available are of poor quality (the output voltage can vary quite dramatically). Using a Metre Bridge (see diagram), which is a simple version of the Wheatstone bridge, I will find the values of three unknown resistors. The way to do this is to move the jockey (marked, in the diagram, by the arrow in contact with the Uniform Wire) until the galvanometer reads 0. It is then said to be balanced.
At balance, no current flows through the galvanometer, so the potential difference across it is zero. This implies that the current flowing through the known resistor P must be equal to that going through Q (P and Q are fixed resistors). In the same way, the current throughout the wire is constant (although different to that passing through the resistors). As the p.d. across the galvanometer is 0, the voltages are constant and you can use Ohm's law to prove that the following equation holds.
P:Q = l1:l2
The I1 current is that flowing through P and Q, the I2 current is that going through l1 and l2).
The metre bridge obeys this relationship (The ratio of P to Q is equal to the ratio of l1 to l2, where Q is the unknown value marked ? on the diagram). By moving the jockey key, you change the ratio of l1:l2, so when the galvanometer reads 0 the ratio of the lengths is the same as the ratio of the fixed resistors. Resistance in the wire is directly proportional to it's length because it is uniform, that is, it has a constant cross-sectional area and so the resistivity equation
R = rl/A
becomes
R µ l
since r and A are constants. The Wheatstone bridge equation assumes that the low resistance wires (as shown in the diagram) actually have zero resistance.
If the galvanometer reads 0 when the jockey is at one of the extremes of the wire, I know that it is either too big or too small. If the galvanometer gives readings closer to 0 when the jockey is at the end near P, then P is too small, and if the jockey is at the end of the wire closest to the unknown resistor when the galvanometer reads 0 then the resistor P is too large.
I will not use any results which have the galvanometer reading 0 when the jockey is near one of the ends when guessing what value Q has. This is because the wire is not uniform near the edges because of the solder causing contact resistances to vary.
Decisions
I am going to use a voltage of 2V to prevent burnouts. Galvanometers are sensitive instruments, high currents can damage them. A low current prevents overheating (and hence burnouts) by reducing the number of collisions [per unit time] that the charge carriers (in this case electrons) have with the medium (wire). The more collisions occur, the higher the temperature will become, and this in turn increases the wire's co-efficient of resistance (r), and hence the actual resistance. As it is important that the resistance be proportional to the length and that for any one point it stays constant throughout the experiment for the Wheatstone bridge equation to work, the heating would ruin results.
Originally, I was going to use a regular ammeter to find, roughly, where the balance point on the wire was. However, it turns out that these are not sensitive enough so I am going to use the galvanometers immediately, being very careful to only touch the wire for brief periods of time at the start (so that I can find the balance point). When I know where the balance point is I will then hold it for longer periods of time, until I find the exact spot. Since the power packs available are not very accurate, I will then take a few more readings every twenty seconds or so to see what range of results I actually get. The original reason for not using a galvanometer straight away (and the reason for only slightly touching the wire with it until a rough balance point is found) is that a large deflection on a galvanometer can damage it.

Resistor F
(In the following section, resistor Q refers to the unknown resistor which was labelled F).
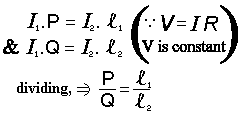
As shown in the results table below, I first used a 3900 W resistor for P (this is approximately the half way point between the highest and lowest resistors available). This, in accordance with Finagle's Law of Dynamic Negatives*, turned out to give completely off-the-scale results. Since the galvanometer indicated that the current was coming from the wire and passing "up" towards the unknown resistor (as shown in the diagram to the right), I deduced that the resistor P was way too large, and jumped straight to a 1.5 W resistor. When I calcuated
Pl 1÷l2
which gives the estimate of the unknown resistor, I got a value of 4.8 W. Further investigation with values of 4.7 W and 5.6 W used as the known resistor P resistors gave 5.3 W and 5.1 W respectively.
| Known Resistor (P) |
Measured l1 |
Average l1 |
Calculated l2 |
Calculated Q (Pl1÷l2) |
Error Margin (DQ) |
|---|---|---|---|---|---|
| 3900 W | Out of range | n/a | |||
| 1.5 W | 23.7, 24, 24.3cm (Dl=±0.3cm) | 24cm | 76cm | 4.8 W | ±0.32 |
| 4.7 W | 46.9, 47, 47.1cm (Dl=±0.1cm) | 47cm | 53cm | 5.3 W | ±0.29 |
| 5.6 W | 52.3cm (stable) (Dl = the size of the jockey) | 52.3cm | 47.7cm | 5.1 W | ±0.27 |
I interpreted my results as meaning that the unknown Q was a 4.7 W resistor since that is the only resistor around 4.8, 5.1, 5.3 which was available (you cannot simply have resistors of any value, only predefined resistances are sold). It is possible that the resistor's actual resistance is higher than the stated 4.7 W (eg, it might be 4.9 W). Since the resistors were all "Gold" types (5% tolerance), the shaded band on the graph shows the possible values of Q, if it was labelled 4.7 W. the center line being more likely, the furthest edge being the "worst case" scenario in terms of accuracy. Note how wide this error margin is... ±5% is quite a lot.
Considering the calculated values, when the experimental error is taken into account, the actual range of what the real value may be is quite worryingly large (for the 1.5 W fixed resistor, the predicted value of Q ranges from 4.5 W to 5.1 W!). This is shown both in the table above (Error Margin) and on the graph - the error range for the results of each known resistor is shown by the height of each bar, the middle dash being the calculated value.
For this particular resistor, it would seem that the results for P as 4.7 W are the most inaccurate. If you look at the graph, you can see that the range is quite a bit out of the "correct" results band. The most probable reason for this discrepancy is lack of comprehensive data: while I did several checks (returning 46.9, 47 and 47.1cm), it may be that had I investigated this resistor in more detail (read, for a longer period of time), I would have found a greater range of results, thus decreasing the average and rendering the calculated value of Q closer to what I believe to be the real value. The other possibilty is that the resistor was faulty in some way.
Resistor E
(In the following section, resistor Q refers to the unknown resistor labelled E).
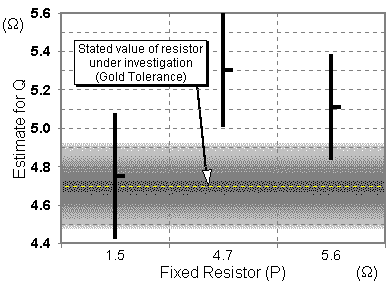
With E, I first used a 5.6 W resistor. The results are shown below. Since the calculated Q result was higher (14.4 W) than 5.6 W, I then used a higher resistor for P, one with a value as close to 14 W as possible (15 W). This gave really odd results. Checking revealed that what I thought was a 15 W resistor was in fact 150 W. It had been mis-filed, and understandably so - it's final brown band (meaning "1 zero") was very dark and looked very much like a black band ("0 zeros") at first. When I got my hands on to a real 15 W resistor, the results were much closer to my expected value (found using Pl1÷l2), and confirmed the previous suggestion that it was a 15 W resistor that I was testing.
| Known Resistor (P) |
Measured l1 |
Average l1 |
Calculated l2 |
Calculated Q (Pl1÷l2) |
Error Margin (DQ) |
|---|---|---|---|---|---|
| 5.6 W | 28.0, 27.9cm (Dl=±0.1cm) | 27.95cm | 72.05cm | 14.4 W | ±0.79 |
| 15 W (150 W) | 95.5, 95, 95.5cm (Dl=±0.3cm) | 95.33 | 4.67 | 0.7 W !!! | (±0.08 - n/a) |
| 150 W | 7.4 W | (±0.78 - see below) | |||
| 15 W | 50.9, 51 (Dl=±0.1cm) | 50.95 | 49.05 | 14.4 W | ±0.78 |
The first 15 W line shows what results I first received for the 150 W resistor and demonstrate why I was temporarily baffled. Note that I am ignoring both set of results for the 150 W resistor (the incorrect ones and the real set), as I said I would in the plan: they are too close to the edges. Note how the results for the 150 W resistor disagree with the more reliable 5.6 and 15 W resistors'. This is a perfect demonstration of the effect of the contacts near the edges.
This graph uses the same conventions as the Resistor F's. I think it is safe to assume that the resistor I was testing is a 15 W resistor, (again, this is the only value which was available within the result's error bars).
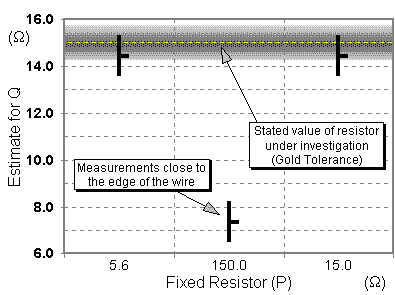
Resistor B
(In the following section, resistor Q refers to the unknown resistor labelled B).
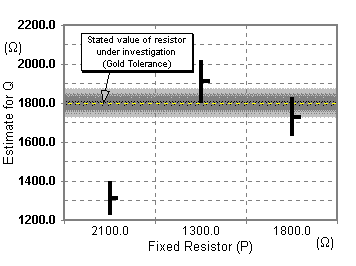
First, I used a 15 W resistor. That was too low. I then tried 2100 W for my fixed resistor P and got 1300 W. To confirm this, I tried 1300 and 1800 W resistors, getting 1900 and 1700 W respectively.
This graph uses the same conventions as the previous two. I think it is safe to assume that the resistor I was testing is a 1800 W resistor, (again, this is the only value which was available within the result's error bars).
These were the results:
| Known Resistor (P) |
Measured l1 |
Average l1 |
Calculated l2 |
Calculated Q (Pl1÷l2) |
Error Margin (DQ) |
|---|---|---|---|---|---|
| 2100 W | 61.3, 61.5, 61.7 cm (Dl=±0.2cm) |
61.5 cm | 38.5 | 1300 W | ±77 |
| 1300 W | 40.5, 40.5, 40.5 cm (Dl = the size of the jockey) |
40.5 cm | 59.5 | 1900 W | ±99 |
| 1800 W | 51 (Dl = the size of the jockey) | 51 cm | 49 | 1700 W | ±90 |
Sources of Error, Error Margin, and Equations Used
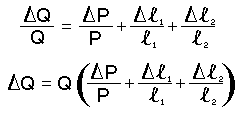
The error margin (DQ) is calculated as follows:
The measuring accuracy is about ±0.04cm, but that is overwhelmed by the uncertainties of the actual measurements, and so I haven't taken this into account.
Possible source of error include:
- The inaccuracy of the resistors themselves (5%).
- The powerpack's not-so-amazing precision
- The wire's uniformity (see below, in the Improvements and Limitations section)
I used the following formula to find the estimated values of Q:
([P]*(100-[l1])/([l1]))
And the following formula to find the error margin (bascially the DQ equation from the top of this section):
([Q]*(0.05+([dl]/l)+([dl]/(100-l))))
The size of the jockey key was 0.1cm (1mm) and therefore when required I have used Dl[jockey] as 0.05cm.
Improvements and Limitations
During research conducted after the investigation, I discovered a method which I had unfortunately overlooked while completing the practical. After getting the results using a certain known resistor, I should have then switched the known resistor and the unknown resistor around so that P was in Q's place and vice versa. This would have helped to compensate for errors arising from the non-uniformity of the so-called uniform wire.
References
* Finagle's Law of Dynamic Negatives: This is the generalized or `folk' version of Murphy's Law, usually rendered "Anything that can go wrong, will". The label `Finagle's Law' was popularized by SF author Larry Niven in several stories depicting a frontier culture of asteroid miners; this `Belter' culture professed a religion and/or running joke involving the worship of the dread god Finagle and his mad prophet Murphy. Some technical and scientific cultures (e.g., paleontologists) know it under the name `Sod's Law'; this usage may be more common in Great Britain. (http://www.ccil.org/jargon)